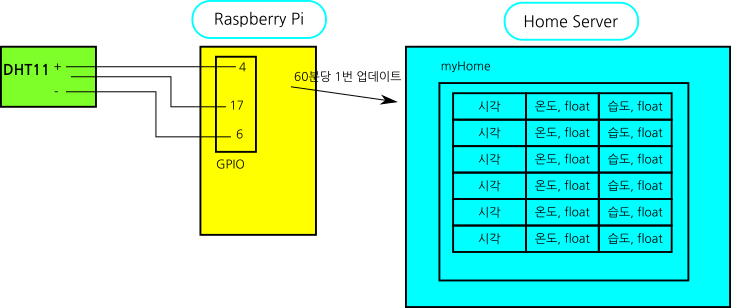
프린터 서버로 동작하는 라즈베리 파이에 온도, 습도를 측정하는 dht11 센서를 달았다. 센서는 1,500원인데 배송비 포함 4,000원에 구매했다. 인터넷에서 바로 사용할 수 있는 python 코드를 찾았지만 동작하지 않아 gcc로 된 코드를 사용했다. 아래 그림과 같이 구성했다.
111에러가 홈 서버 접속 시도를 차단했다. 찾아보니 서버 내 my.cnf 파일 bind 설정을 수정해야 함을 알았다.
워드 프레스 테마 디렉토리 안 functions.php를 보면 사용자 정의 함수를 만들고, 데이터베이스를 조회할 수 있다. functions.php 파일을 수정하기 보다, header.php를 간단하게 수정했다. 스타일 등 html을 잘 모르기 때문에 가장 간단한 정보만 표시했다. 아래는 header.php 파일이다. 마지막에 4줄 정도만 넣었다.
<?php
/**
 * The header for our theme
 *
 * This is the template that displays all of the <head> section and everything up until <div id="content">
 *
 * @link https://developer.wordpress.org/themes/basics/template-files/#template-partials
 *
 * @package WordPress
 * @subpackage Twenty_Seventeen
 * @since Twenty Seventeen 1.0
 * @version 1.0
 */

?><!DOCTYPE html>
<html <?php language_attributes(); ?> class="no-js no-svg">
<head>
<meta charset="<?php bloginfo( 'charset' ); ?>">
<meta name="viewport" content="width=device-width, initial-scale=1">
<link rel="profile" href="https://gmpg.org/xfn/11">

<?php wp_head(); ?>
</head>

<body <?php body_class(); ?>>
<?php wp_body_open(); ?>
<div id="page" class="site">
	<a class="skip-link screen-reader-text" href="#content"><?php _e( 'Skip to content', 'twentyseventeen' ); ?></a>

	<header id="masthead" class="site-header" role="banner">

		<?php get_template_part( 'template-parts/header/header', 'image' ); ?>

		<?php if ( has_nav_menu( 'top' ) ) : ?>
			<div class="navigation-top">
				<div class="wrap">
					<?php get_template_part( 'template-parts/navigation/navigation', 'top' ); ?>
				</div><!-- .wrap -->
			</div><!-- .navigation-top -->
		<?php endif; ?>

	</header><!-- #masthead -->

	<?php

	/*
	 * If a regular post or page, and not the front page, show the featured image.
	 * Using get_queried_object_id() here since the $post global may not be set before a call to the_post().
	 */
	if ( ( is_single() || ( is_page() && ! twentyseventeen_is_frontpage() ) ) && has_post_thumbnail( get_queried_object_id() ) ) :
		echo '<div class="single-featured-image-header">';
		echo get_the_post_thumbnail( get_queried_object_id(), 'twentyseventeen-featured-image' );
		echo '</div><!-- .single-featured-image-header -->';
	endif;
	?>


	<div class="site-content-contain">
		<div id="content" class="site-content">

/*여기 추가*/
<div align="center">
<?php
$mydb = new wpdb('????','?????','???','???');$results = $mydb->get_results("SELECT * FROM `dataTemperatureAndHumidity` ORDER BY `dataTemperatureAndHumidity`.`time` DESC limit 1");foreach($results as $result){echo "온도: "; echo $result->temperature; echo ", 습도: "; echo $result->humidity;echo ", 수집시각: ";echo $result->time;}
?></div>
다음은 라즈베리안에서 돌아가는 gcc 파일이다. 인터넷 파일 그대로 사용했고, crobtab으로 30분에 한번 실행하도록 했다. 다음 컴파일 할 때 mysql과 wiringPi 옵션을 주어야 한다.
/* mysql connect and query sample */
#include <stdio.h>
#include <stdlib.h>
#include <mysql.h>
#include <time.h>
#include <unistd.h>
#include <wiringPi.h>
#include <stdint.h>
#define MAXTIMINGS 83
#define DHTPIN 0
int dht11_dat[5] = {0, } ;

void read_dht11_dat()
{
	uint8_t laststate = HIGH ;
	uint8_t counter = 0 ;
	uint8_t j = 0, i ;
	uint8_t flag = HIGH ;
	uint8_t state = 0 ;
	float f ;
	dht11_dat[0] = dht11_dat[1] = dht11_dat[2] = dht11_dat[3] = dht11_dat[4] = 0 ;
	pinMode(DHTPIN, OUTPUT) ;
	digitalWrite(DHTPIN, LOW) ;
	delay(18) ;
	digitalWrite(DHTPIN, HIGH) ;
	delayMicroseconds(30) ;
	pinMode(DHTPIN, INPUT) ;
	for (i = 0; i < MAXTIMINGS; i++) {
		counter = 0 ;
		while ( digitalRead(DHTPIN) == laststate) {
			counter++ ;
			delayMicroseconds(1) ;
			if (counter == 200) break ;
		}
		laststate = digitalRead(DHTPIN) ;
		if (counter == 200) break ; // if while breaked by timer, break for
		if ((i >= 4) && (i % 2 == 0)) {
			dht11_dat[j / 8] <<= 1 ;
			if (counter > 20) dht11_dat[j / 8] |= 1 ;
			j++ ;
		}
	}
	if ((j >= 40) && (dht11_dat[4] == ((dht11_dat[0] + dht11_dat[1] + dht11_dat[2] +
						dht11_dat[3]) & 0xff))) {
		printf("humidity = %d.%d %% Temperature = %d.%d *C \n", dht11_dat[0],
				dht11_dat[1], dht11_dat[2], dht11_dat[3]) ;
	}
	else printf("Data get failed\n") ;
}

float RandomFloat(float a, float b) {
	//seed 값 현재 시각으로 초기화
	srand(time(NULL));
    float random = ((float) rand()) / (float) RAND_MAX;

    float diff = b - a;
    float r = random * diff;
    return a + r;
}

int main(int argc, char **argv)
{
		if (wiringPiSetup() == -1) exit(1) ;
		char temp[10];
		char humidity[10];

		read_dht11_dat();

		sprintf(temp, "%d.%d", dht11_dat[2], dht11_dat[3]);
		sprintf(humidity, "%d.%d",dht11_dat[0], dht11_dat[1]);

		MYSQL mysql;
		MYSQL *conn;
        MYSQL_RES *result;
        MYSQL_ROW row;

		//printf("now: %d-%d-%d %d:%d:%d\n",tm.tm_year+1900, tm.tm_mon+1, tm.tm_mday,tm.tm_hour,tm.tm_min, tm.tm_sec);

        char query_buffer[2048];
		conn = mysql_init(&mysql);

		//float temper, centerVal;		//온도, 중심값.
		//centerVal=25;
		//한글을 사용하기 위해 utf-8로 설정.
		mysql_options(conn, MYSQL_SET_CHARSET_NAME, "utf8");
		mysql_options(conn, MYSQL_INIT_COMMAND, "SET NAMES utf8");
		//18, 19행은 한글 사용하기 위해, mysql  옵션 수정..
		//아래는 서버 설정에 맞도록 수정..
		if(!mysql_real_connect(conn, "????", "????", "????", NULL, 3306, NULL, 0)){
				fprintf(stderr,"error %s", mysql_error(conn));
				printf("cannot connect");
				exit(1);
		}
		else{
			//아래는 test_db를 사용하도록 수정..
				if (mysql_select_db(conn, "????")){
						printf("cannot use databases");
						exit(1);
				}
		}

			time_t t =time(NULL);
			struct tm tm = *localtime(&t);

			sprintf(query_buffer, "select * from dataTemperatureAndHumidity");
			mysql_query(conn, query_buffer);
			result = mysql_store_result(conn);

			while( (row = mysql_fetch_row(result)) != NULL){
				printf("row[0],%s, %s, %s",row[0], row[1], row[2]);
			}
			sprintf(query_buffer, "INSERT INTO `dataTemperatureAndHumidity`(`time`, `temperature`, `humidity`) VALUES ('%d-%d-%d %d:%d:%d', %s, %s);",tm.tm_year+1900,tm.tm_mon+1,tm.tm_mday,tm.tm_hour,tm.tm_min, tm.tm_sec, temp, humidity);


			if (mysql_query(conn, query_buffer)){
					printf("query faild : %s\n", query_buffer);
					exit(1);
			}

		mysql_close(conn);

}
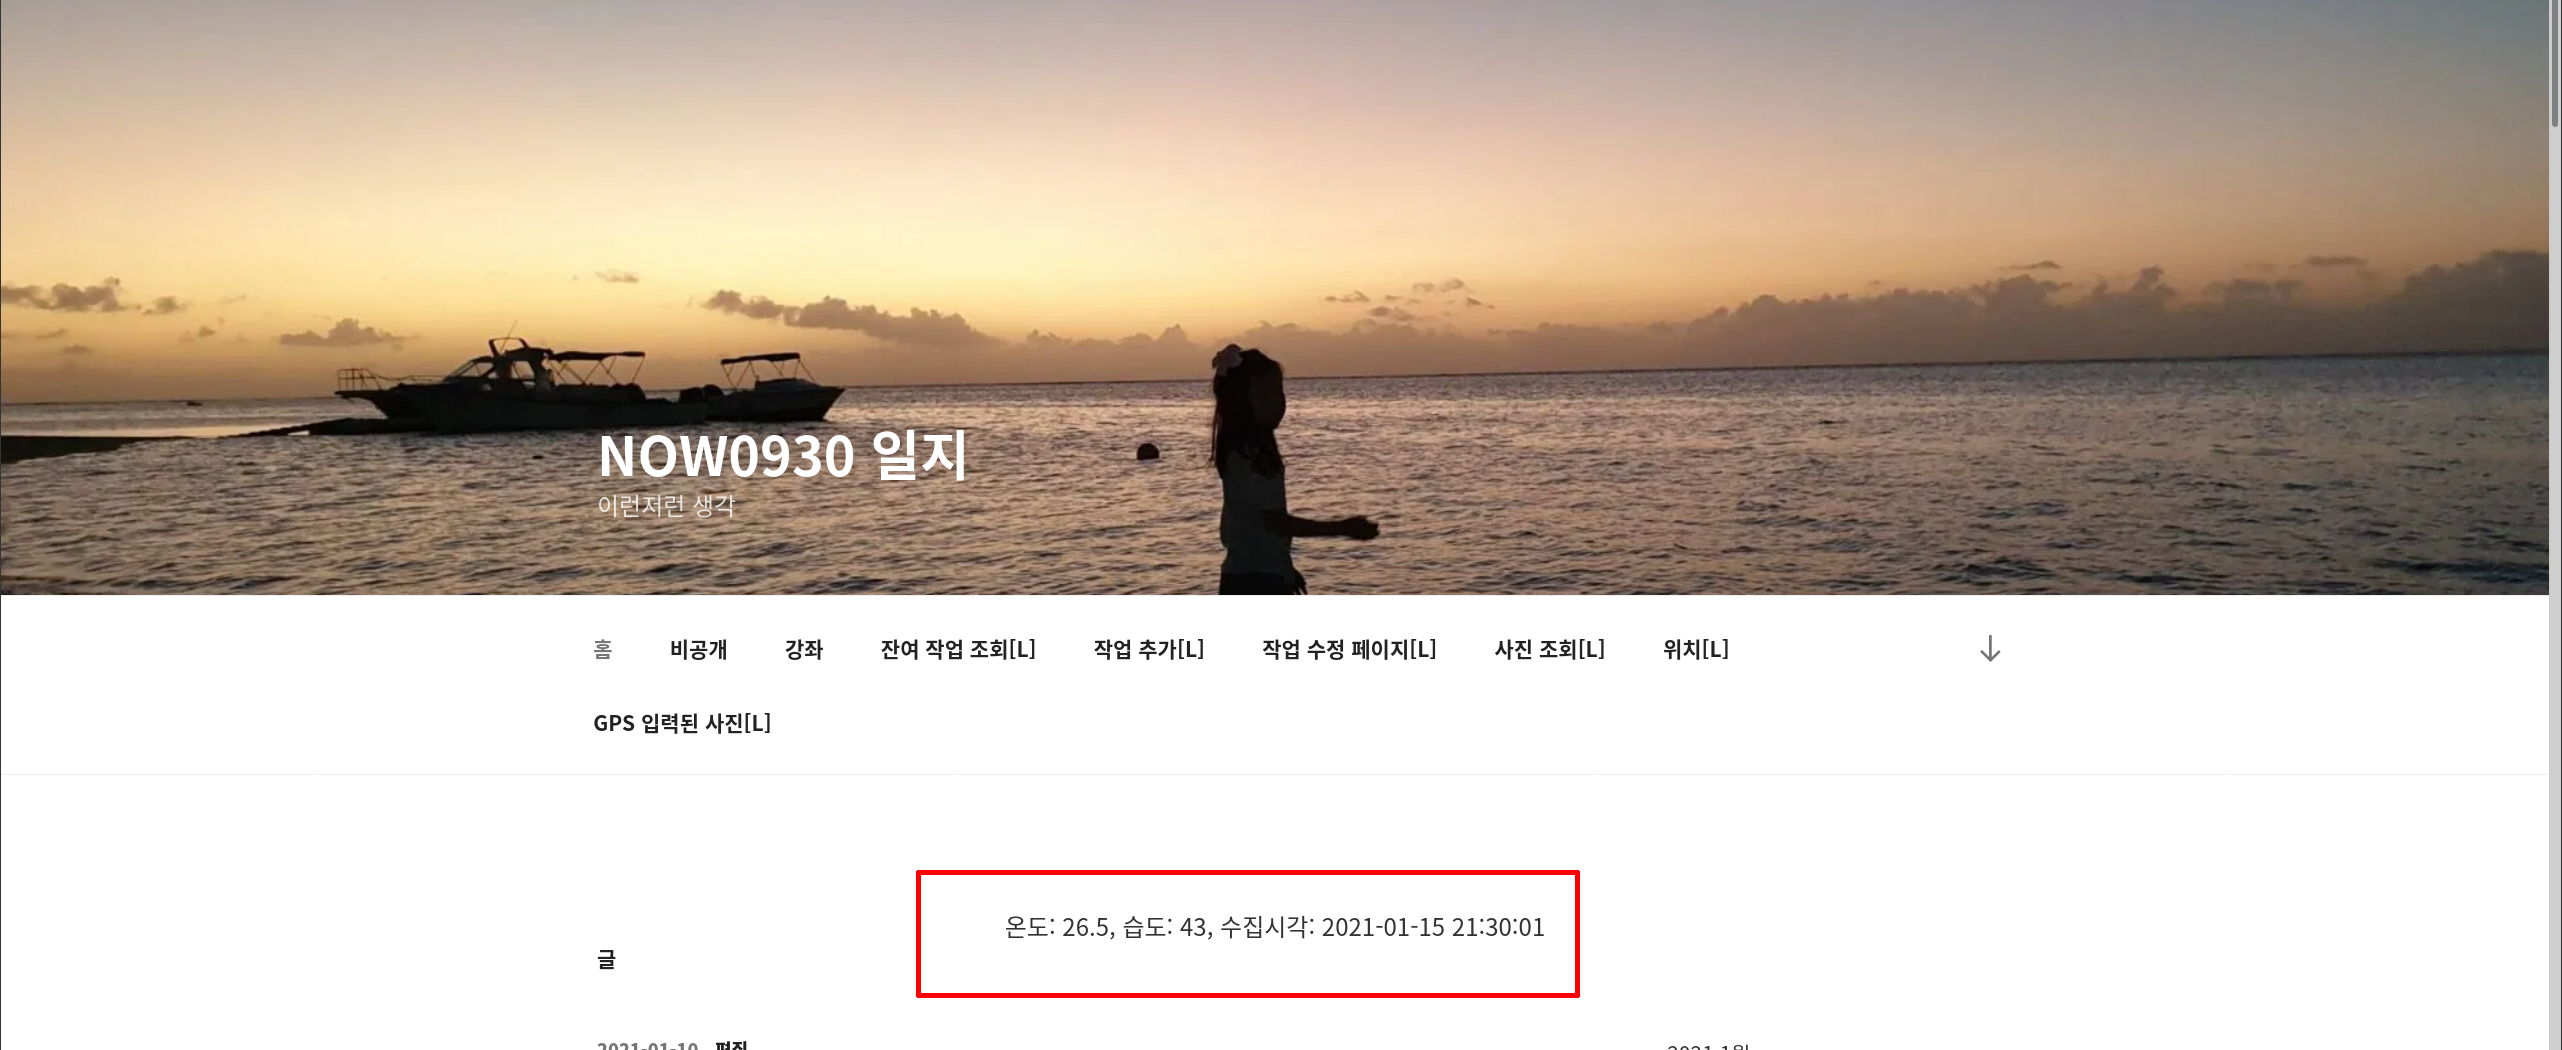
마누라에게 자랑하니, 왜 만들었냐고 한다. 아래 그림과 같이 잘 나온다.
(업데이트)그래프를 그릴 수도 있다.
jpgraph 모듈을 설치해야 한다. 아래 사이트에서 jpgraph를 다운로드 받아 적당한 web page에 넣어 준다.
header.php에 graph를 직접 넣으면 안된다. JpGraph Error: HTTP headers have already been sent 이런 에러가 난다. php가 파일로 변환 후 html이 이미지로 표시하게 한다.
header.php
<?php
/**
 * The header for our theme
 *
 * This is the template that displays all of the <head> section and everything up until <div id="content">
 *
 * @link https://developer.wordpress.org/themes/basics/template-files/#template-partials
 *
 * @package WordPress
 * @subpackage Twenty_Seventeen
 * @since Twenty Seventeen 1.0
 * @version 1.0
 */

?><!DOCTYPE html>
<html <?php language_attributes(); ?> class="no-js no-svg">
<head>
<meta charset="<?php bloginfo( 'charset' ); ?>">
<meta name="viewport" content="width=device-width, initial-scale=1">
<link rel="profile" href="https://gmpg.org/xfn/11">

<?php wp_head(); ?>
</head>

<body <?php body_class(); ?>>
<?php wp_body_open(); ?>
<div id="page" class="site">
	<a class="skip-link screen-reader-text" href="#content"><?php _e( 'Skip to content', 'twentyseventeen' ); ?></a>

	<header id="masthead" class="site-header" role="banner">

		<?php get_template_part( 'template-parts/header/header', 'image' ); ?>

		<?php if ( has_nav_menu( 'top' ) ) : ?>
			<div class="navigation-top">
				<div class="wrap">
					<?php get_template_part( 'template-parts/navigation/navigation', 'top' ); ?>
				</div><!-- .wrap -->
			</div><!-- .navigation-top -->
		<?php endif; ?>

	</header><!-- #masthead -->

	<?php

	/*
	 * If a regular post or page, and not the front page, show the featured image.
	 * Using get_queried_object_id() here since the $post global may not be set before a call to the_post().
	 */
	if ( ( is_single() || ( is_page() && ! twentyseventeen_is_frontpage() ) ) && has_post_thumbnail( get_queried_object_id() ) ) :
		echo '<div class="single-featured-image-header">';
		echo get_the_post_thumbnail( get_queried_object_id(), 'twentyseventeen-featured-image' );
		echo '</div><!-- .single-featured-image-header -->';
	endif;
	?>


	<div class="site-content-contain">
		<div id="content" class="site-content">

<div align="center">
<?php


		$ydata = array();
		$y2data = array();
		$xdata = array();
		$mydb = new wpdb('???','???','???','???');
		$results = $mydb->get_results("SELECT * FROM `dataTemperatureAndHumidity` ORDER BY `dataTemperatureAndHumidity`.`time` DESC limit 30");
		foreach($results as $result){
			$ydata[] = $result->temperature;
			$y2data[] = $result->humidity;
			$xdata[] = strtotime($result->time);
			#echo $result->time;
		};
		#echo gettype($xdata[0]);

// Create graph instance
require_once ('jpgraph/src/jpgraph.php');
require_once ('jpgraph/src/jpgraph_line.php');
require_once ('jpgraph/src/jpgraph_date.php');

// Some (random) data
#$ydata = array(11,3,8,12,5,1,9,13,5,7);

// Size of the overall graph
$width=400;
$height=100;

// Create the graph and set a scale.
// These two calls are always required
$graph = new Graph($width,$height);
$graph->SetScale('datlin');
$graph->title->Set("Temperature");

$graph2 = new Graph($width,$height);
$graph2->SetScale('datlin');
$graph2->title->Set("Humidity");

// Create the linear plot
$lineplot=new LinePlot($ydata, $xdata);
$lineplot2=new LinePlot($y2data, $xdata);

// Add the plot to the graph
$graph->Add($lineplot);
$graph2->Add($lineplot2);

// Display the graph
$graph->Stroke("./temperature.jpg");
$graph2->Stroke("./humidity.jpg");

?></div>
<div align = "center"><img src = "./temperature.jpg"/> <img src = "./humidity.jpg" /> </div>
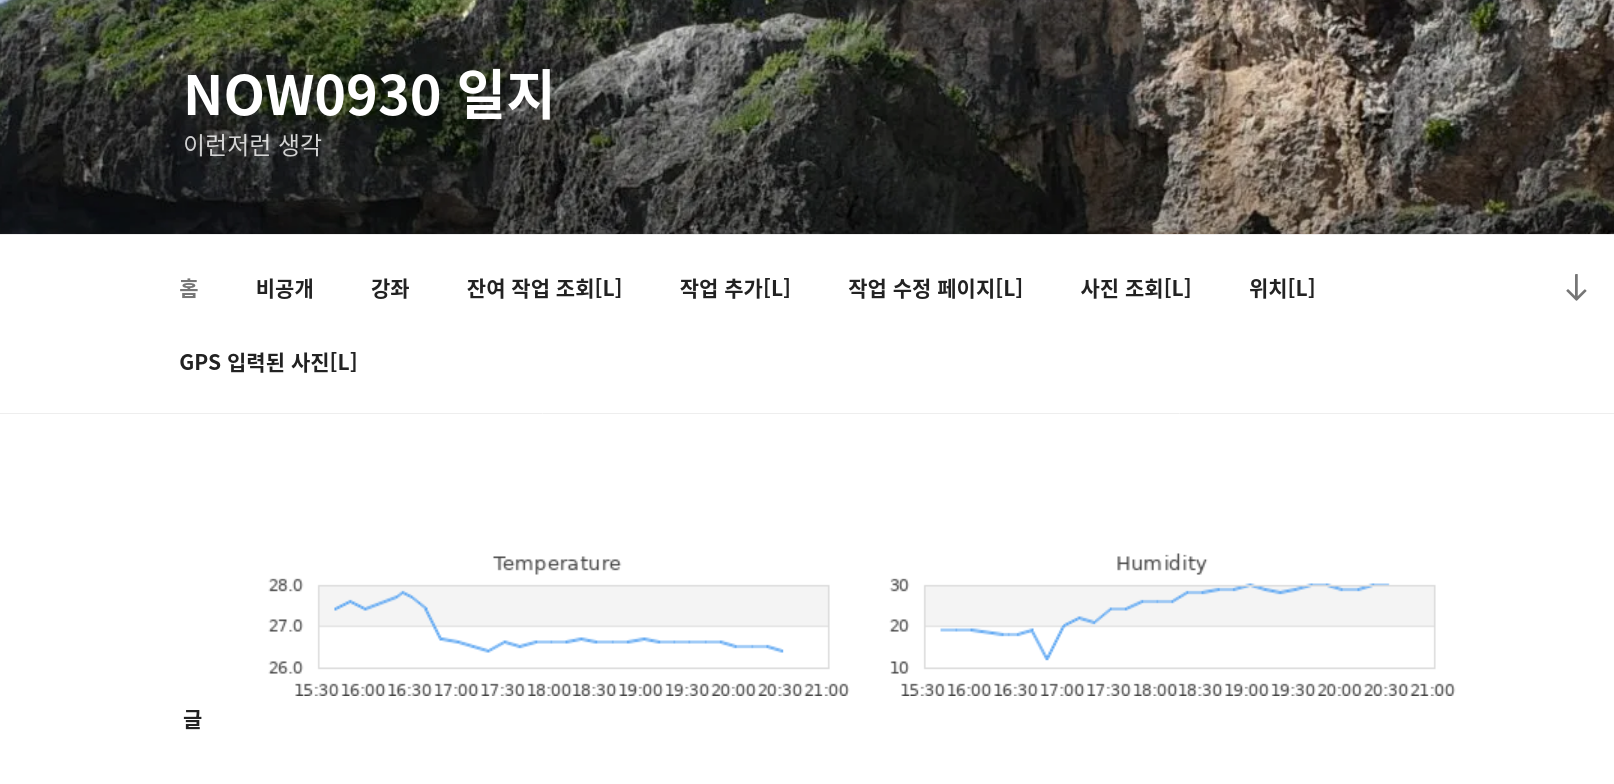
잘 표시된다. 홈 페이지가 갈수록 괴상하게 변한다.